I personally feel that practicing Qigong poses below works much better than coffee.
 Usually in the afternoon, I go to the bathroom at work, do one of the poses described below for 5 min and feel totally recharged. I feel it's absolutely necessary to start with the first method and practice it for at least 6 month (or better yet for a whole year) every day before proceeding to the next one.
By Erle Montaigue 5th October 1999
When I began teaching Qigong back in the early 70's, I was probably one of the only Westerners to be teaching this wonderful healing art. Since then a plethora of different so-called Qigong methods have come mainly out ofChina claiming
all kinds of miraculous healing benefits.
However, many are no more than a simple exercise, which in itself will do anyone who is totally unfit and unhealthy a lot of good. So it is most cases not the new Qigong that is doing the trick but rather the simple fact that the patient is at last getting some much needed exercise, albeit very little exercise at that!
And it is the same with Qigong done incorrectly for the sake of an instant
'hit' of power. At some time, that power must dissipate giving the opposite
feeling of not so well-being and weakness! This is because so much yang Qi is
built up during incorrect Qigong practice that at some time, it must burst
through the incorrect tensions caused through incorrect stances and reach the
brain all at once! This is incorrect of course as the brain along with the rest
of the body must receive a constant and balanced flow of Qi from the ground via
the K1 points.


See Photo No. 1 and 1A for correct posture.
Feet are parallel and shoulder width apart when measured on
the outside of the feet.
The 'parallel' bit should be measured on the inside of the feet which causes the outsides to be only marginally unparallel.
The knees are bent so that if a straight and vertical line were drawn from your knees to the ground, it would touch the tip of the big toe.
The back is vertical and as straight as possible given that the back is never fully straight! You must sink straight down and not bend the back backwards at all. This is one big mistake that most people make. In fact I would say that I would correct 99% of all students on this. And I keep on correcting them year after year!
So if you are standing up straight and were to place a string onto the roof with a small weight on the end of it which was located over your crown, that weight would still be in that position once you bent your knees.
The chin is held pulled in slightly but not forced and the tongue is placed up onto the hard palate like saying the letter 'L'.
The eyes are not closed nor are they fully open (staring). They will look to the ground about 20 feet away.
The shoulders are dropped naturally and the arms are held such that you are sort of hugging a tree with the elbows dropped below the wrists and shoulders.
The palms are turned out slightly so that they are at an angle of 45 degrees to the ground with a straight line of skin but not stretched between thumb and forefinger.


The palms are held in the typical "Tile Palm Hand" where each finger is kind of layered over the next like the tiles on a roof.
The fingers of each palm are held about three inches apart. And as a beginner the upper side of the forefingers should be in line with the under side of your nose.
The buttocks are held slightly under naturally as this is the natural position for the lower back when the knees are bent. Do not force the bum under as this is just as bad as sticking it out.
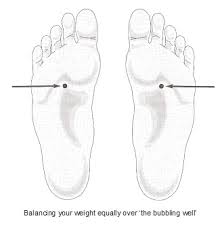
The Toes are held slightly but not as much as to turn your toes white, concave. Like as if they are gripping the ground. This is to bring yin and yang into the base of the foot so that the Yang Qi will be drawn down to the 'Bubbling Well' point (KD 1) to be re-routed all over the body.
The breathing should be deep but relaxed and not forced. In the beginning you should always use a natural breathing pattern where the abdomen expands upon inhalation and contracts upon exhalation. You breathe with your diaphragm and not your neck! So do not tense up your neck, just treat it as a straw through which the diaphragm pulls air into your lungs. Just breathe naturally allowing the natural rhythm to take over.


You should in the beginning hold this posture for at least 15 minutes, but start with 5 min. This is difficult; however, it will be worth it. You will begin to shake, not violently but a vibration will take over your whole body and you will begin to perspire from your palms and fingertips.
After some minutes, check your posture again to make sure that you haven't slowly crept up and your knees are still bent.
To finish, slowly lower your palms to a lower position to near your lower abdomen and hold that position for a few minutes. Photo No. 2. After you are adept at holding this position, you can do the first two thirds of the total time with your palms in the upper position and then the last third of the total time with your palms in the lower position. When you have had enough, slowly raise both palms out to your sides and up to shoulder height inhaling as you do this, then bring both palms to chest height and press downward from chest to lower abdomen as you exhale and straighten your legs slowly. Do not make any sudden movements nor in particular have anything cold to drink for at least five minutes, just walk around slowly.
Photo No. 2

The non-thought process would take up a whole book so it is sufficient to say that you should simply but with much difficulty, think upon nothing at all!
Just do nothing, no conscious thought at all! This is the secret to good Qigong.

This is the one we use in the martial arts. It sends 60% Qi into the hands and only 40% into the legs. So it is obvious that you should not ONLY train in this one Qigong, you should always perform the basic 3 Circle Qigong as mentioned above. Then, if you wish, do these next few Qigong methods at other times or substitute one of them at a time in conjunction with your Basic Qigong.
The 'Six Balanced Pairs" must also be apparent in Qigong as it is for Taijiquan. So if you look at the above basic Qigong method you will notice in particular that the elbows and knees are aligned. It is the same for this Qigong method.
Hands and Feet corresponding to Stomach and Spleen
Knees and Elbows corresponding to Kidneys and Bladder
CV1 (Point) and The Crown (GV20) corresponding to the Pericardium meridian and the Triple Heater Meridian.
Buttocks and Axilla (Armpits) corresponding to the Gallbladder and Liver
Coccyx and Back of the head at GB19 point corresponding to the Heart and Small Intestine.
Shoulders and Hips corresponding to the Lungs andColon .
Usually in the afternoon, I go to the bathroom at work, do one of the poses described below for 5 min and feel totally recharged. I feel it's absolutely necessary to start with the first method and practice it for at least 6 month (or better yet for a whole year) every day before proceeding to the next one.By Erle Montaigue 5th October 1999
When I began teaching Qigong back in the early 70's, I was probably one of the only Westerners to be teaching this wonderful healing art. Since then a plethora of different so-called Qigong methods have come mainly out of
However, many are no more than a simple exercise, which in itself will do anyone who is totally unfit and unhealthy a lot of good. So it is most cases not the new Qigong that is doing the trick but rather the simple fact that the patient is at last getting some much needed exercise, albeit very little exercise at that!
However, the same cannot be said of the original 'Post' standing Qigong
methods as these have stood the test of time and have had done on them much
scientific research always with positive results.
Having said that, it is most important that the patient learns these
standing Qigong methods absolutely correctly as damage can be done to the
internal energy (Qi) system of the body resulting in some instances, brain and
mind problems, mental problems and immune system imbalances!
People still get it wrong of course and they also teach incorrect Qigong
methods to others. The reason is that they simply have not had the training
necessary to be up on the dangers and dangerous ways of performing Qigong.
For
instance certain stances in Qigong may seem to have tremendous power due to an
upsurge of 'rising Qi' from the point called the 'Bubbling Well Point' or
Kidney point No. 1.
This gives an immediate 'hit' of well being and power
in much the same way that coffee and its associated caffeine gives an immediate
hit to the brain causing the neuro-inhibitors to be retarded this causing the
brain waves to speed up dramatically. However, the brain waves must at some
stage slow back down again and then people do into deep depression etc.! So
they have to take more caffeine and so the cycle continues until usually a
complete breakdown occurs!
Read more on Standing Qigong in my other posts:
I highly recommend the following books on Standing Qigong
The Classic Qigong Methods
You cannot go past the original classic Qigong stances and there are many
different stances for many different reasons, some of which I will show in this
article. In my some 30 years of practicing and teaching Qigong I have
experimented with myself and my own students with the various postures and what
they are supposed to do. I have given up teaching some Qigong methods and have
kept only the ones that I have found to be of real help.
Method No. 1
For general good health and as a beginner's Qigong we always start with the
3 Circle Standing Qigong.
This is the 'Mother' of all Qigong methods and you
cannot go past this for good health and an overall balancing method.
It
balances the amount of Qi out in the upper and lower body by supplying 60% to
the lower part and 40% to the upper which is natural.
See Photo No. 1 and 1A for correct posture.
Photo No. 1
 |
Photo No. 1A
 |
The 'parallel' bit should be measured on the inside of the feet which causes the outsides to be only marginally unparallel.
The knees are bent so that if a straight and vertical line were drawn from your knees to the ground, it would touch the tip of the big toe.
The back is vertical and as straight as possible given that the back is never fully straight! You must sink straight down and not bend the back backwards at all. This is one big mistake that most people make. In fact I would say that I would correct 99% of all students on this. And I keep on correcting them year after year!
So if you are standing up straight and were to place a string onto the roof with a small weight on the end of it which was located over your crown, that weight would still be in that position once you bent your knees.
The chin is held pulled in slightly but not forced and the tongue is placed up onto the hard palate like saying the letter 'L'.
The eyes are not closed nor are they fully open (staring). They will look to the ground about 20 feet away.
The shoulders are dropped naturally and the arms are held such that you are sort of hugging a tree with the elbows dropped below the wrists and shoulders.
The palms are turned out slightly so that they are at an angle of 45 degrees to the ground with a straight line of skin but not stretched between thumb and forefinger.
The palms are held in the typical "Tile Palm Hand" where each finger is kind of layered over the next like the tiles on a roof.
The fingers of each palm are held about three inches apart. And as a beginner the upper side of the forefingers should be in line with the under side of your nose.
The buttocks are held slightly under naturally as this is the natural position for the lower back when the knees are bent. Do not force the bum under as this is just as bad as sticking it out.
The Toes are held slightly but not as much as to turn your toes white, concave. Like as if they are gripping the ground. This is to bring yin and yang into the base of the foot so that the Yang Qi will be drawn down to the 'Bubbling Well' point (KD 1) to be re-routed all over the body.
The breathing should be deep but relaxed and not forced. In the beginning you should always use a natural breathing pattern where the abdomen expands upon inhalation and contracts upon exhalation. You breathe with your diaphragm and not your neck! So do not tense up your neck, just treat it as a straw through which the diaphragm pulls air into your lungs. Just breathe naturally allowing the natural rhythm to take over.
You should in the beginning hold this posture for at least 15 minutes, but start with 5 min. This is difficult; however, it will be worth it. You will begin to shake, not violently but a vibration will take over your whole body and you will begin to perspire from your palms and fingertips.
After some minutes, check your posture again to make sure that you haven't slowly crept up and your knees are still bent.
To finish, slowly lower your palms to a lower position to near your lower abdomen and hold that position for a few minutes. Photo No. 2. After you are adept at holding this position, you can do the first two thirds of the total time with your palms in the upper position and then the last third of the total time with your palms in the lower position. When you have had enough, slowly raise both palms out to your sides and up to shoulder height inhaling as you do this, then bring both palms to chest height and press downward from chest to lower abdomen as you exhale and straighten your legs slowly. Do not make any sudden movements nor in particular have anything cold to drink for at least five minutes, just walk around slowly.
Photo No. 2
The non-thought process would take up a whole book so it is sufficient to say that you should simply but with much difficulty, think upon nothing at all!
Just do nothing, no conscious thought at all! This is the secret to good Qigong.
The 2nd Qigong Method. (Holding the Baby) Photo No. 3
Photo No. 3This is the one we use in the martial arts. It sends 60% Qi into the hands and only 40% into the legs. So it is obvious that you should not ONLY train in this one Qigong, you should always perform the basic 3 Circle Qigong as mentioned above. Then, if you wish, do these next few Qigong methods at other times or substitute one of them at a time in conjunction with your Basic Qigong.
The 'Six Balanced Pairs" must also be apparent in Qigong as it is for Taijiquan. So if you look at the above basic Qigong method you will notice in particular that the elbows and knees are aligned. It is the same for this Qigong method.
The Six Balanced Body pairs:
Knees and Elbows corresponding to Kidneys and Bladder
CV1 (Point) and The Crown (GV20) corresponding to the Pericardium meridian and the Triple Heater Meridian.
Buttocks and Axilla (Armpits) corresponding to the Gallbladder and Liver
Coccyx and Back of the head at GB19 point corresponding to the Heart and Small Intestine.
Shoulders and Hips corresponding to the Lungs and
Turn your right foot (to begin with) out by 45 degrees and
lower your weight onto that foot with the centre of gravity being just forward
of where your leg joins your foot. In other words, just forward of the front of
your heel pad. The right knee is bent so that the tip of the knee is in a
vertical line with the tip of your big toe. It is more important during this
Qigong to adhere to this rule as you will have all of your weight placed onto
only one leg placing more physical pressure onto that leg. It is very important
that you do not allow your knee to deviate from this position, otherwise you
could do your knee some damage from incorrect alignment. Many people perform
the posture of "Stork Spreads Wings" absolutely incorrectly by
allowing their knee to angle inwards so that the vertical line would be
somewhat to the left of their right knee. This will cause all kinds of bone and
ligament problems later in life.
Place your left foot's heel so that it touches your right heel and the foot is pointing to an angle of 45 degrees to that right foot. Now, move your left foot in a straight line to where it is pointing, out to where it is almost straight but not quite.
Place your left foot's heel so that it touches your right heel and the foot is pointing to an angle of 45 degrees to that right foot. Now, move your left foot in a straight line to where it is pointing, out to where it is almost straight but not quite.
Turn your hips so that your upper body is now pointing to where
your left foot is pointing. This is the danger time as far as knee alignment is
concerned. By turning your waist and hips, you could move your knee away from
that alignment.
You should at this stage be able to lift your left foot off the ground without moving any weight onto the right foot. All of your weight is now placed onto your right foot.
Both Palms are facing slightly upward and if you were to draw a line flat on the palms that line would meet the ground at an angle of about 45 degrees.
The Top of your left finger should be in a line that is under your nose.
The fingers are again held in the "Time Palm Hand" position with a straight piece of skin between thumb and forefinger.
Breathing, Tongue and lower abdomen is the same for the basic Qigong. You should hold this position for only 3 minutes at the most in the beginning as it will place some strain onto your legs. Then you should go on to the left side and hold that side for 3 minutes. You will however, find that at each change of leg, you can hold the position for a little longer as the Qi is now beginning to assist the muscles.
No. 1: You will feel a burning piercing pain in the center of your thigh like a red-hot needle is piercing your leg.
No. 2: After some more time, this piercing pain will dissipate into a warm all over glow around your thigh.
No. 3: You will begin to shake.
The shaking is a sign that you should not change legs. Allow the shaking to continue for about 20 seconds before changing legs. You will discover that you will be able to hold the position for slightly longer each time you change legs. You must of course spend the same amount of time standing on each leg. The time you spend is up to you.

This method is the same as for the basic 3 circle standing Qigong however, your palms will be placed above your head with the PC 8 (Laugung) pointing down to the middle of your crown. Laugung is an important Qi emission point on the palm located where your longest finger points to when you hold a tight fist.
The important points of this Qigong are: make sure that your shoulders do not lift up as this is usually what happens when you raise your arms up so high. A little trick used to cause you to know when you have them raised is to physically raise the shoulders while in this position as high as you are able. Then relax them so that they will drop down to the correct position.
You should hold this position for at least ten minutes. It will be difficult but the rewards are great. This is the one the Aldus Huxley advocated while experimenting with drugs! I do not advocate experimenting with drugs of course as we now know better. However, the mind enhancement that he received was not from the drugs but rather from the Qigong!
You should at this stage be able to lift your left foot off the ground without moving any weight onto the right foot. All of your weight is now placed onto your right foot.
Raise your palms so that they are in
accordance with your feet. The left palm will be forward of the right. The
palms however, are NOT situated over each foot but rather more to the center of
your feet.
The Fingers of your right palm will point to a position
that is about one inch towards the left palm end over the center of your
forearm. (7 tsune or cun: Both spellings are pronounced as the first spelling).
Both Palms are facing slightly upward and if you were to draw a line flat on the palms that line would meet the ground at an angle of about 45 degrees.
The Top of your left finger should be in a line that is under your nose.
The fingers are again held in the "Time Palm Hand" position with a straight piece of skin between thumb and forefinger.
Breathing, Tongue and lower abdomen is the same for the basic Qigong. You should hold this position for only 3 minutes at the most in the beginning as it will place some strain onto your legs. Then you should go on to the left side and hold that side for 3 minutes. You will however, find that at each change of leg, you can hold the position for a little longer as the Qi is now beginning to assist the muscles.
The Three Signs
There are three things to look for especially when using the above Qigong. And this is very important to avoid any muscular damage!No. 1: You will feel a burning piercing pain in the center of your thigh like a red-hot needle is piercing your leg.
No. 2: After some more time, this piercing pain will dissipate into a warm all over glow around your thigh.
No. 3: You will begin to shake.
The shaking is a sign that you should not change legs. Allow the shaking to continue for about 20 seconds before changing legs. You will discover that you will be able to hold the position for slightly longer each time you change legs. You must of course spend the same amount of time standing on each leg. The time you spend is up to you.
3rd Method: Qigong for the Brain/Mind: (Photo No. 4)
Photo No. 4This method is the same as for the basic 3 circle standing Qigong however, your palms will be placed above your head with the PC 8 (Laugung) pointing down to the middle of your crown. Laugung is an important Qi emission point on the palm located where your longest finger points to when you hold a tight fist.
The important points of this Qigong are: make sure that your shoulders do not lift up as this is usually what happens when you raise your arms up so high. A little trick used to cause you to know when you have them raised is to physically raise the shoulders while in this position as high as you are able. Then relax them so that they will drop down to the correct position.
You should hold this position for at least ten minutes. It will be difficult but the rewards are great. This is the one the Aldus Huxley advocated while experimenting with drugs! I do not advocate experimenting with drugs of course as we now know better. However, the mind enhancement that he received was not from the drugs but rather from the Qigong!
This one is good if you have to take an exam etc.

Stand as for the No. 2 method with one foot forward of the other. Hold your palms as in the photo facing downward to the ground, the left one (if your left foot is forward) will be forward of the right. And again, the elbows are over each knee.
You will have to imagine and 'feel' the Laugung point in the center of your palms as this is the point that we use to enhance the Qi giving ability.
As you breathe in for the first time deeply, imagine that the breath is coming into your body from the ground into your rear heel. (The Qi is actually coming in through the Qi input point of K 1 (Kidney Point No. 1) on the base of your foot. However, it is the heel just forward of it, that is the 'activation' point for this point.) Now take that breath up and over you head via your backbone, down the front of your face and out along the top of your left arm down to the ground again via that Laugung point. If you are doing this correctly that point will buzz and will turn slightly red. On your next inhalation, this time drag the breath up through the right Laugung point in your right palm. Up the inside of your right forearm, through your armpit over your head. Then down the front of your face again and out via the left Laugung point again to earth. Continue this for at least 5 minutes then change legs and sides and repeat on the other side.
This method can be used with the basic 3 circle standing Qigong position as
it is a breathing technique and not a specific physical stance.
As you inhale, drag the 'breath' up from the ground via your right heel (for a male) or left heel (for a female). I will give the more common 'male' way of doing it here as the female way is to simply reverse everything! You must completely relax your anus sphincter when inhaling, this is the whole crux of this exercise. The breath (Qi) will then be routed over your head, down the front of your face, down the front of your body to the tantien point near CV 4 about 3 inches below your navel. When the Qi gets to the middle of your forehead to the 'third-eye point', this is when you begin to exhale. As you exhale, you must now tighten slightly the anus sphincter, thus locking and packing in the Earth Qi. Do not squeeze the sphincter too tightly as it only needs a tweak! Continue in this way for the whole time of standing.
As you can see, all of the above methods are based upon basic standing Qigong. If you never learn another Qigong in your life, you will not lose out on anything as you have all there is in the above for Qi enhancement and therefore Body and mind enhancement.
For more information go to the following posts:
http://spirithealers.blogspot.com/2013/06/standing-meditation-produced-superior.html
http://spirithealers.blogspot.com/2013/06/standing-meditation-produced-superior_28.html
-->
4th Method: Qigong to Enhance Your Qi Transference Ability: (Photo No. 5)
Photo No. 5Stand as for the No. 2 method with one foot forward of the other. Hold your palms as in the photo facing downward to the ground, the left one (if your left foot is forward) will be forward of the right. And again, the elbows are over each knee.
You will have to imagine and 'feel' the Laugung point in the center of your palms as this is the point that we use to enhance the Qi giving ability.
As you breathe in for the first time deeply, imagine that the breath is coming into your body from the ground into your rear heel. (The Qi is actually coming in through the Qi input point of K 1 (Kidney Point No. 1) on the base of your foot. However, it is the heel just forward of it, that is the 'activation' point for this point.) Now take that breath up and over you head via your backbone, down the front of your face and out along the top of your left arm down to the ground again via that Laugung point. If you are doing this correctly that point will buzz and will turn slightly red. On your next inhalation, this time drag the breath up through the right Laugung point in your right palm. Up the inside of your right forearm, through your armpit over your head. Then down the front of your face again and out via the left Laugung point again to earth. Continue this for at least 5 minutes then change legs and sides and repeat on the other side.
5th Method: To Build Upon Your Post-Natal
Qi:
This method can be used with the basic 3 circle standing Qigong position as
it is a breathing technique and not a specific physical stance. As you inhale, drag the 'breath' up from the ground via your right heel (for a male) or left heel (for a female). I will give the more common 'male' way of doing it here as the female way is to simply reverse everything! You must completely relax your anus sphincter when inhaling, this is the whole crux of this exercise. The breath (Qi) will then be routed over your head, down the front of your face, down the front of your body to the tantien point near CV 4 about 3 inches below your navel. When the Qi gets to the middle of your forehead to the 'third-eye point', this is when you begin to exhale. As you exhale, you must now tighten slightly the anus sphincter, thus locking and packing in the Earth Qi. Do not squeeze the sphincter too tightly as it only needs a tweak! Continue in this way for the whole time of standing.
As you can see, all of the above methods are based upon basic standing Qigong. If you never learn another Qigong in your life, you will not lose out on anything as you have all there is in the above for Qi enhancement and therefore Body and mind enhancement.
For more information go to the following posts:
http://spirithealers.blogspot.com/2013/06/standing-meditation-produced-superior.html
http://spirithealers.blogspot.com/2013/06/standing-meditation-produced-superior_28.html
Did you know that you can shorten your long urls with AdFly and get $$$ from every click on your shortened urls.
ReplyDelete